Ensures that the guest level diagnostics are enabled for all virtual machines.
Risk Level: Medium
Description
This plugin guarantees that the guest level diagnostics feature is enabled in Azure Virtual Machine (VM). This feature assists in gathering information on the VMs' processing and the state of all Virtual Machine applications.
About the Service
Azure Virtual Machines:
Azure Virtual Machines (VM) are one of several forms of scalable, on-demand computing resources offered by Azure. VMs are typically used when you require more control over the computing environment than the other options provide. To know more, read here.
Impact
The Guest-Level Diagnostics feature may be used to gather additional important information about your Virtual Machines, such as usage and other statistics, as well as add custom alarms for CPU and memory usage limitations. This will help in improving the performance and efficiency of the virtual machines as well as increase security and reliability.
Steps to Reproduce
Using Azure Console-
- Log In to your Azure Console.
- Navigate to the Home portal of the Azure Console and click on All services.
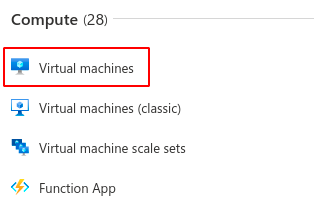
- Select Virtual machine under Compute to access all the virtual machines present in the directory. You can use this link here to navigate directly if you’re already logged in.
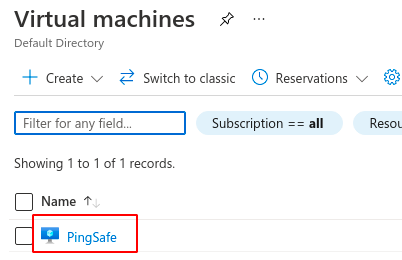
- In the list of Virtual Machines (VM) displayed, select a VM you wish to investigate.
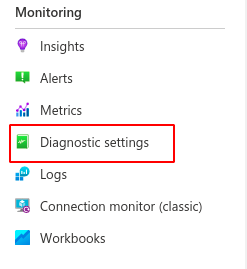
- From the navigation panel on the left side of the console, go to Diagnostic settings in the Monitoring section.
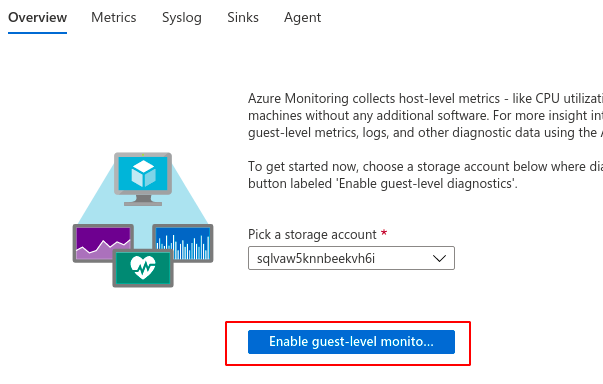
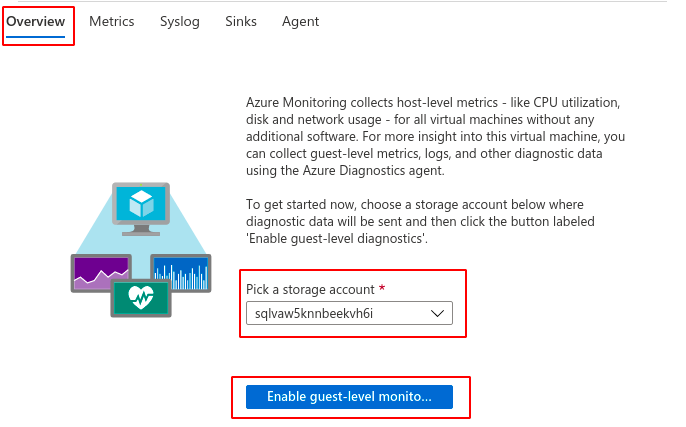
- If the “Enable guest-level monitoring” button is displayed in the Overview tab, then the guest-level monitoring feature is disabled.
- Repeat steps 4 to 6 for all the scale sets you want to investigate in the selected directory.
- If you have multiple directories, repeat steps 2 to 7 for each directory in your Azure Console.
Steps for Remediation
Determine whether or not you truly require the guest-level monitoring feature to be disabled. If not, make the necessary changes to enable it using the steps below.
Using GCP Console-
- Log In to your Azure Console.
- Navigate to the Home portal of the Azure Console and click on All services.
- Select Virtual machine under Compute to access all the virtual machines present in the directory. You can use this link here to navigate directly if you’re already logged in.

- In the list of Virtual Machines (VM) displayed, select a VM you wish to re-configure. (In case you aren’t sure which one needs to be configured, follow the steps to reproduce listed above to determine which VM to choose.)

- From the navigation panel on the left side of the console, go to Diagnostic settings in the Monitoring section.

- In the Overview tab, pick a storage account from the dropdown list provided.
- Next, click on the “Enable guest-level monitoring” button to enable this feature. Enabling this feature can take a while. Once it is enabled, click on Save to apply all the changes.
- Repeat steps 3 to 7 for all the VM scale sets you want to reconfigure in the selected directory.
- If you have multiple directories, repeat steps 2 to 8 for each directory in your Azure Console.
